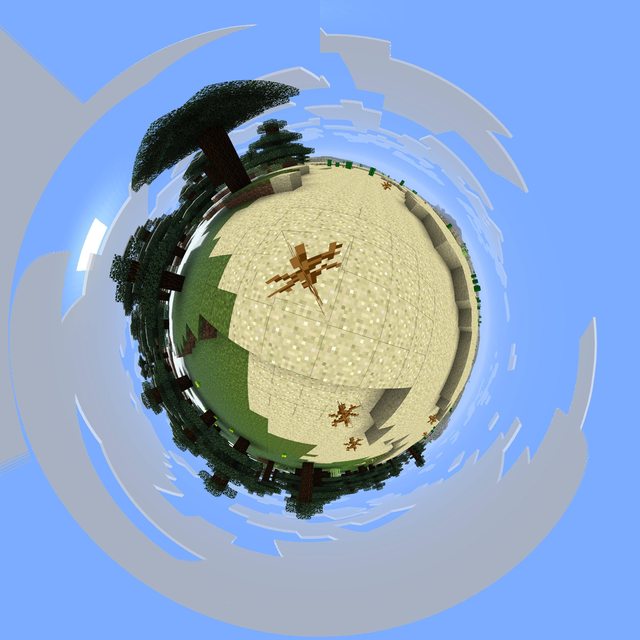
With this mod, you can quickly create accurate backgrounds for the main menu. If you want it to, it adds them to your texturepack directly. The mod also allow you to make panorama images of various types. With the help of Photoshop or GIMP, you can even make your world look like a planet! If you are interested in animation, you have the ability to make timelapses of anything that you can make an image of.
General Info
- Everything in the mod is accessed using the P-key.
- When the mod captures the images, it does a bunch of changes, such as hiding the HUD, changing FoV and resolution. Don’t panic! Everything gets restored when it’s done.
- Remember not to have any achievement messages open.
- When you take any sort of image, remember to let the terrain load!
- If you press escape, you will cancel taking images
- If alt-tab out of minecraft, you will pause the image capturing.
Settings
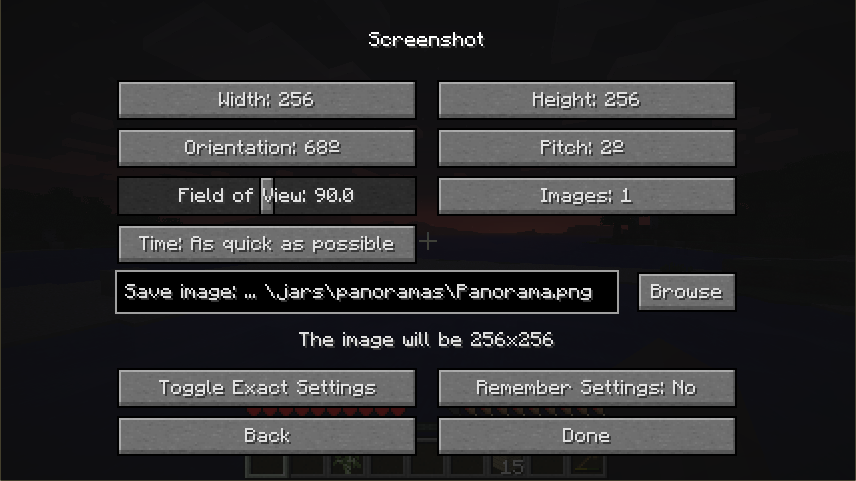
- Columns – How many screenshots that are taken while rotating 360 degrees horizontally. The more screenshots, the narrower each will be.
- Rows – How many screenshots that are taken vertically for each horizontal. It works the same as with the columns, the more the smaller.
- Resolution – The resolution is the same as both width and height of a single screenshot in a basic panorama panorama. When you increase the number of columns or rows, each screenshot will be narrower. Then instead, you can think of it as (roughly) a fourth of the width of the final image.
- Time – If you take a single image, a delay will be added evenly between all the pieces, so the image takes the set time to make. If you instead have more images, each image will be taken as quickly as possible, but with delay between the images instead. If you set the time lower than what your computer can handle, the images will simply be rendered without delay.
- Orientation – For horizontal panoramas the orientation is the leftmost point in the image. In the Panorama+ mode (and background mode), it is the ”center” of the image. (Try panorama+ with the Center setting to ”cross” and you will see where it is)
- Toggle Manual Settings – Changes the buttons into textboxes or sliders, so you can choose any custom value.
Using the Textboxes:
When you toggle to manual settings, many of the usual buttons and sliders change. Besides orientation that becomes a slider, all buttons become textboxes. With these you can type in your own values for things instead of the presets. The textboxes in this mod are more advanced than the old ones were in Minecraft even though they aren’t quite like the new ones yet, but it can be good to know the differences. Here is a list of the changes compared to the old ones.
- You are able to scroll with left/right arrows
- Infinitely long texts are allowed (for filepaths) – Only a part is seen, but the rest can be reached through scrolling.

- Use Home/End keys to jump to beginning/end
- Besides backspace, delete also works
- Holding a key will activate repeating
- The textbox turns red if something is wrong, for example if you are missing “.png” or if a number isn’t valid.

Installation:
Windows
You can use any zip-program, but using WinRAR you do the following:
- Close Minecraft if it’s open
- Go to %appdata%.minecraftbin
- Right click minecraft.jar and select Open with/WinRAR
- Delete the folder META-INF (so the game doesn’t freeze)
- Now open the mod’s zip-file in the same way did before
- Drag and drop everything into minecraft.jar
- Done!
Mac
- Open Terminal from Applications & Utilities
- Type in the following code, line by line:
cd ~ mkdir mctmp cd mctmp jar xf ~/Library/Application Support/minecraft/bin/minecraft.jar
- Outside of terminal, drop the .class files into mctemp
- Back inside terminal, type in the following, line by line again:
rm META-INF/MOJANG_C.* jar uf ~/Library/Application Support/minecraft/bin/minecraft.jar ./ cd .. rm -rf mctmp
- Done

![[1.6.4] PanoramaKit Mod Download](https://minecraft-forum.net/wp-content/uploads/2013/01/PanoramaKit-Mod-2-130x100.jpg)


